Should you sand a model car before painting?
As a model car collector, one of the common questions is that if you should really sand a model car before painting. In this blog post, you’ll learn why to sand the model car before painting and learn whether you can paint the car without sanding.
You should sand your model car before painting whether the car is built using metal, wood, or plastic. It doesn’t matter because sanding is integral to maintain its quality. The reason for sanding is to remove the rough edges thus have good finishing after the paint.
If you are trying to repaint a model car, the recommendation is to sand the car before painting. However, they are those with contrary options. It leaves the question of whether you should sand a model car before painting or not. This article is about explaining this topic in great detail.
Do you have to sand a model car before painting?
It is recommended that you need to sand a model car before painting. The reason behind having to sand model cars before painting is to remove or reduce the imperfections. If you don’t sand the car after painting, you will start to notice the imperfections you could have removed through sanding.
The first question we need to ask is what is sanding?
Sanding refers to the use of abrasive materials in the quest to remove the car’s paint. When sanding a model car, the target is not only to remove the imperfections; thus, after painting the car, the finish is fantastic.
There are different ways to sand a model car, either using sandpaper or an electric orbital sander. Also, there are different sandpapers used when carrying out a different task.
Here are my recommendations.
Electric Orbital Sander

Sandpaper

For beginners and casual collectors, sandpaper is actually good enough but I see better results with an electrical orbital sander.
Sanding is also important when working on a model with a large and flat surface. It is through sanding you can avoid hollows on the surface caused by finger sanding.
Sanding before panting will also remove the scratches on the model car surface, and also sanding assist in filling in any gaps on the surface.
You need to know what sanding is before proceeding. You have to know the process and if it is really necessary to sand a model car or not.
How do you sand a model car?
Here is a summary of the steps in sanding a model car:
- Have a 1,200 grit sanding paper or an electrical orbital sander ready
- Sand uneven sections and remove paint lines
- Remove the primer and expose the bare metal
- Fully remove the paint before sanding
- Paint the model, avoid too much paint and brush stroke marks
- Try to only dip your brush’s bristles halfway into the paint
- Look for brush strokes and uneven paint and fix right away
- Only remove any particles from the model car with compressed air or cloth
If you are planning to sand a model car, you need to do it the right way. You need to have sanding pads or 1,200-grit paper; with either of these two, you can easily remove the existing paint and make the surface have perfect for painting.
When you use high-grit sandpaper, you can remove the uneven sections and remove paint lines. Thus you can paint your model car using less paint.
For better results, you ought to remove the primer and expose the bare metal. It after this will not have issues trying to match the paint you would like to apply with the existing paint.
Failure to fully remove the existing paint will lead to inconsistencies because even the kind of paint used those days is different from today-based paints and gel coats.
Therefore, to avoid being sorry after painting your model car and not turning out as you wish, remove the existing paint through proper sanding.
After sanding your model car and it is time to paint, avoid using too much paint on one area, which may lead to visible brush strokes.
Also, look for brush stroke lines or uneven paint patches after you’ve finished painting. Before applying any clear coatings or polishing compounds, look for these flaws. This will allow you to make any necessary adjustments before applying the finishing touches to your model car.
To avoid applying too much paint at once, only dip your brush’s bristles halfway into the paint. You might also use enamel paint instead of acrylic because enamel paint has certain self-leveling properties that will hide these flaws.
Only remove any particles from the model car with compressed air or cloth when the imperfections are buffed with sandpaper. Try not to use your hands to avoid fingermarks.
After that, you’re free to repaint. After that coat has dried for the necessary amount of time, you can apply your clear coat and proceed to polishing and waxing.
How to Sand small objects on a model car
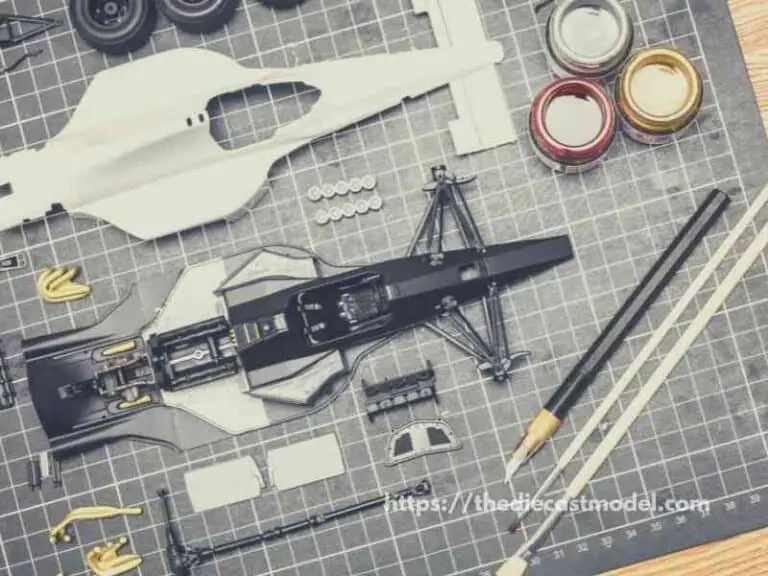
The model car is made up of small detailed parts which are not easy to sand, and they need sanding for the paint to come out perfectly. You don’t have to worry because we share with you how to sand those small parts in a model car.
Today model cars are made using plastic model kits, so this procedure is meant to be applied if you are sanding a model car made up of plastics.
The first step is to get the tips of your fingers wet and then pick up those small parts. Then in a smooth motion, move those parts across the abrasive.
Try to move the part in a smooth motion as they are fragile because they are made up of plastics.
Can you repaint a car without sanding?
You can repaint a car without sanding although this process is not recommended. The reason is that sanding is important to avoid any flaws during the painting process such as bumps that can form when sanding is not done. The only exception of not needing to sand is if the existing paint is not damaged.
It is not recommended to paint your model car without sanding. However, if you don’t see the need to sand, especially if the existing paint is not damaged and the color you would like to paint is the same as existing gone, you can go ahead. But don’t blame anyone for the imperfections which you will notice after painting.
Note if the existing paint is not the same as the one you would like to paint, the paint is the same but faded, or the color is too old, don’t try to paint without sanding. There will be too many imperfections which I’m sure will not please you.
If you hold still to paint without sanding, first wash the model car, apply wax and remove grease before painting.
Final words
It is important to sand your model car before painting. Finishing is a big part of scale modeling, especially when it comes to vintage models like battleships and planes.
Sanding gradually with finer grades can remove any undesired imperfections, scratches, or marks, leaving a smooth surface to apply paint or varnish.
Sanding is a process that can take your time, but it is an important step, especially in modeling and painting a model car.

“Only the things I love”
thediecastmodel.com is reader-supported. When you buy through links on the site, I earn an affiliate commission.
So, here are the things I love when taking care of my Diecast Models.
Cleaning the Models
The first we are going to talk about is cleaning the models.
Removing Dust
- Air Brush – For me, this is the best since it not just removes dust but you can use it in painting/clear coating.
- Air Duster – This is a good alternative to Airbrush
- Normal Brush – If you are short on budget, you can use a normal brush. However, make sure that the brush has soft bristles because there are some hard brushes than can cause scratches. That’s why I recommended a good brush that can do the job properly.
Cleaning and Shining Hacks
Well, here are some of my cleaning hacks for removing scratches, oxidation, and so much more.
- Removing Decal Adhesive – Use Goo Gone on those hard-to-remove decal adhesives. It works fast and works like charm!
- Waxing and Polishing – Here is something a lot of people don’t know. Waxing protects the clear coat and paint while polishing shines the model. Instead of buying it separately, use a 2 in 1 to save money. Get this instead.
- Beginner Wax – The wax I recommended earlier is good and provides the best results based on my experience. But a beginner might have a problem especially if they’re not good at applying wax. Solid wax reaching hard to reach surface can be hard to remove. You have two choices here. One is to use a qtips to reach those surfaces, another is to use a liquid wax I recommended.
- Cleaning Wheels, Rubber, Plastic – Do not forget that rubber and plastic surface are quite different, especially in the cleaning process. Just wiping it down won’t do the job. That’s why I use Meguiar’s Vinyl and Rubber Cleaner and Conditioner. Works like charm!
- Make the Wheels Shine! – Making our models look good won’t be complete without tiny details such as shiny wheels! Do not forget this because however small this is, the difference can be as big as night and day.
- Remove Scratches Easily – Tiny scratches are not the end for your model. Here is a simple trick I’ve been using to make my models look scratch-free even without repainting. Use T-Cut.
Painting the Models
Painting Tools
Make sure when you paint models, have these ready.
- Tape – A tape is important if you are painting a straight line. Furthermore, it will prevent your paint to scatter on other parts. I recommend Tamiya Tape since it is really made for models. Furthermore, they stick really well preventing paint splatters.
- Brush (Beginner) – Find a good set of brushes to paint your models. Of course, you can opt for an airbrush but it’s quite expensive.
- Airbrush (Intermediate/Expert) – This will yield a significantly better result than an ordinary brush because you can easily spray the paint evenly. I recommend this if you know what you’re doing.
- Stand(Optional) – Stands are good because it can be hard to manually hold the models while painting. It is optional but in my opinion, the price is well worth it for the comfort it gives.
- Drop Cloths – Drop Cloths will protect your surroundings from the paint.
- Primer – The most common beginner mistake I see is painting models without any Primer. A primer will prevent imperfections such as bubbles or paint not sticking to your models. It is a small price to pay for quality results.
- Clear Coat – A clear coat will protect the paint of your models. This will make the paint last longer. Also, it is the one responsible for making your models shine.
Paints
Of course, you can’t do painting properly without paint. So here are the ones I recommend.
- Acrylic Paint – Good for beginners because it dries quickly. However, it doesn’t produce results as good as enamel paint.
- Enamel Paint – Provides a good quality finish and longer-lasting paint. However, it takes longer to dry and requires expertise to use.
Model Maintenance
Model Storage
- Simple Wood Cabinet – While it doesn’t let you display your models, wooden cabinets are good storage for these models. For one, they are not heat conductors which means that the temperature inside will remain constant and remain cool. Furthermore, they prevent light from reaching the models which can cause oxidation.
- Clear Cabinet with Lock – If you want to display your models, then I recommend this. It closes so dust won’t easily get to your models. I also recommend you don’t put more than 1 model in each compartment since metals are good conductors of heat.
Model Photography
So you want to show off your models to others? Well, I got you covered.
Here is my beginner-friendly model photography tutorial that teaches everything from taking pictures to the editing process.
You will also see me doing hands-on photography in that tutorial.
Here is the link: How to Take Pictures of a Diecast Model or Model Kit | Helpful Illustrated and Video Guide
Sources: