Do You Need a Special Track for DCC? A Look Into the Things You Need To Start a DCC Layout
When researching about upgrading your layout to DCC, you might notice how the cost can pile up, making you wonder if you should change everything, including the track. However, knowing what to upgrade and what not will give you significant savings since some of the things in the layout, including the tracks, are usually compatible with both DC and DCC.
You do not need a special track for DCC. However, most layouts need to change their wirings to run smoothly on DCC. Generally speaking, DCC uses a higher voltage and ampere than DC, which requires thicker wiring connections.
This blog post will talk about DC and DCC tracks. What specific things on the track should you change when converting to DC, and what are the things you can retain. This can save you money on your upgrade since you don’t need to make everything new when upgrading to DCC.
Are DC and DCC track the same?
The tracks used in DC and DCC are the same. While their type of power is different, both can easily flow on the rail to run the train’s motor. However, other parts used in the rail, such as the wirings, usually need to accommodate the increase in voltage when using DCC.
In a model train layout, the track’s purpose is to align the locomotive and its cars and supply energy to the train motor.
This post will discuss the second purpose since this is also why many people wonder if they need to change the track to accommodate a new DCC layout.
The good news is changing tracks is not necessary since DCC and DC tracks are the same. Therefore, both AC and DC power can flow freely on train tracks.
But what is the DC and AC I am talking about? For that, let’s briefly introduce DC and DCC.
DC controls are also known as analog controls. It runs on DC or Direct Current. Hence the name DC.
DCC is also known as digital controls or Digital Command Control. It runs on AC or Alternating Current.
Both use different types of power, which are DC and AC. AC allowed DCC controls to run train accessories such as smoke puff sounds or produce smoke.
Both these power can freely flow on the tracks, making it possible to run the engine. In addition, since the tracks are good conductors of AC and DC power, there is no need to change tracks.
For an in-depth discussion regarding the differences between DC and DCC, feel free to check my other post here: DC vs. DCC.
However, please don’t think that since the rails are compatible with both DC and DCC, you can just plug the feeders into the rail with no problems.
A common misconception among train modelers is that since the tracks are compatible, they would only get the DCC controller sets and be done with them.
However, this causes more problems in the long run, such as short circuits.
To prevent this, we need to change the main electrical wiring or bus to accommodate DCC controls and power.
Generally speaking, while you don’t need to change tracks when switching from DC to DCC, you need to change the main electrical bus or wiring to at least 14 AWG. This allows enough wirings to accommodate the increase in voltage and amperes DCC has over DC.
Modelers often neglect this tiny aspect and can cause more significant problems in the future when wirings overheat. Sometimes, it can even cause short circuits to the train motor.
When you start train modeling, you would usually get a DC-specific main electrical bus that is generally narrower than the recommended wirings on DCC.
While the wire will work perfectly fine for DC, it is a different story on DCC.
DC runs on 0-12 volts with 1 to 2 amperes. On narrow wires attached to DC sets, this power is low enough not to produce problems.
However, DCC uses not just a different type of power but also a stronger one. In fact, DCC runs on 16-22 volts depending on the type and can go for 5 to 8 amperes.
With this increase, tiny wires made for DC would receive extreme strain due to the rise in voltage and amperes.
Thus, we need bigger wiring for the rails.
Most modelers would recommend at least 14 AWG for the thickness of the main electrical bus. This is good enough to accommodate the increase in amperes from DCC power.
While some would think 14 AWG is too much, it is better than experiencing engine failure or short circuits in the future. Being sure is better than sorry.
In the next section, I will give a simple breakdown of the cost it will take to upgrade your layout from DC to DCC. This will include the wiring, controls, and the decoders inside the motor.
What do I need to run DCC?
To run DCC, you need to get a DCC controller, electric feeders, a main electrical bus, power cab panels(PCP), power supply, and decoders. However, you can also get DCC controller sets that already include the power cab panels and power supply, so you only need to buy wirings and decoders.
So, you are now ready to run on DCC since you now know what you need to change.
While the rail doesn’t need any changing, the wirings will surely need changing, except if you already use at least 14 AWG wirings on the main electrical bus.
*
| Items Needed | Price |
| Main Electrical Bus (14 AWG, 100ft) | $20 |
| Feeders | $8 |
| Power Cab or DCC Controller set (with PCP and Power Supply) | $220 |
| Decoders | $20 |
Generally speaking, you need at least $268 to convert a simple DC layout to DCC. This already includes the controller set, wirings, and a decoder for one locomotive. However, more complex layouts and other brands might cost more.
You will have an estimated cost of changing to DCC from the table above. Please note that I specifically included the wirings since beginners often neglect them.
Furthermore, this is also something they regret later on when their layout starts to short circuit or overheat.
Here is a graphical illustration of the essential parts of a DCC layout. Take a look at the tracks and the wirings.
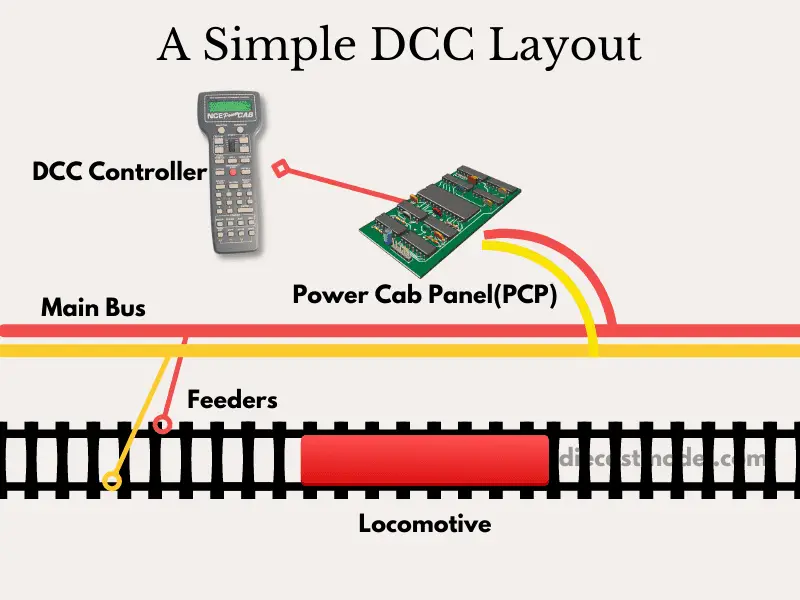
But why are these parts important? First, let’s talk about a brief introduction to these things you need for a simple DCC layout.
- DCC Controller – DCC Controllers are where the modelers will control the speed and direction of the train. It is also known as Power Cab.
- Electric Feeders – Electric Feeders supply the power from the main electrical bus to the rails.
- Main Electrical Bus – The main electrical bus is a long wire that usually runs along the track. This is the power source of the electric feeders that will connect with the track.
- Power Cab Panels – The Power Can Panel will instruct the decoders based on the modeler’s input on the controller.
- Power Supply – This supplies the power for the whole DCC system.
- Decoders – This is the tiny chip inside the train locomotive that interprets the message sent by the power cab panels.
Now that you know the basics of DCC, you can now do your upgrade.
Generally speaking, you don’t need a new track since it is compatible with DC and DCC. However, make sure to change the wirings if it is not compatible with DCC.
What’s next? Now that you know you don’t need to change the rails. You should find out if you should change your locomotive engines. Furthermore, if you’re short on cash, should you upgrade the controllers or the trains first? That’s what I talked about in this post: Can DC locomotives run on DCC?