What Is % Grade on Model Railroading? A Table Summary With Computation Tutorial
The percent grade is the elevation of the track per a hundred feet. For example, a 1% grade means that the elevation increases by 1 foot per 100 feet. In model railroading, we use the same concept but in inches. For example, a 1% grade means the elevation rises by an inch per 100 inches. This rule applies to almost all train scales, including HO, N, and OO scales.
This post will discuss rail grade and its purpose in model railroading. We will also discuss why it is essential and provide a simple graphic on how people measure grades.
What is a rail grade?
A rail grade is the amount of change in the height of the track. This is measured by how much the rail height changes every 100 feet.
A train should always go straight in a perfect world without changing altitudes such as elevation or depression.
Any change in the rail height requires more force and promotes wear and tear on train parts.
However, since the world isn’t plain, there are times when train tracks need to be elevated.
The amount of change is called the rail grade, which is measured by percentage.
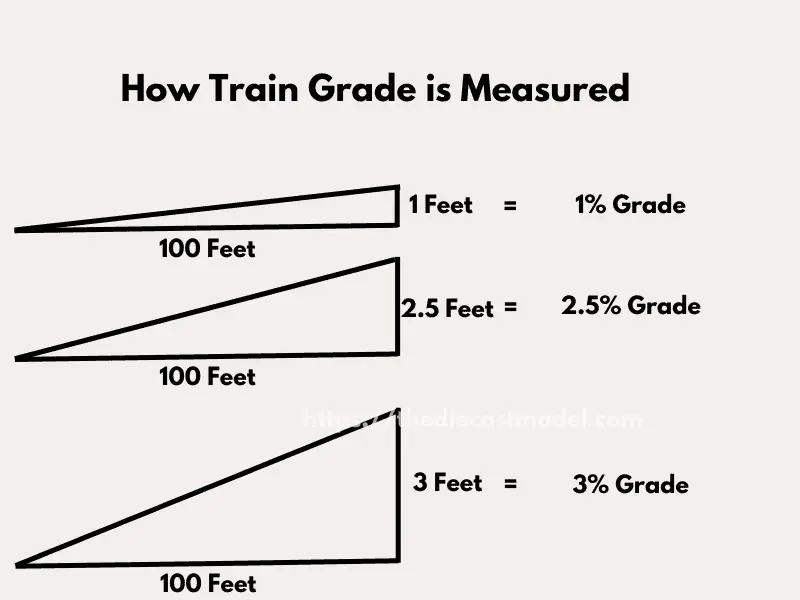
If you check the illustration above, that’s how a train grade is measured.
To calculate a railroad grade, we have to measure the amount of elevation or descent per 100 feet. For example, a 2.5% grade means 2.5 feet increase in height per 100 feet.
The steepest train grade is 5.89% which is called the Madison Incline found in America.
However, grades as high as these are very rare. In fact, most trains wouldn’t go as high as 2.2% grade.
But why? Why do real trains don’t go for a very high rail grade?
Well, grades cause multiple problems, such as increased energy consumption and wear and tear.
Why? Well, this is caused by gravity.
Imagine this.
A train going uphill means it needs more energy to climb the track. Furthermore, the train needs to properly align with the rails since it might slip because of gravity.
The increase in energy requirements means they will burn more fuel and it also causes more wear to the rail since it needs to hold the train as it combats gravity.
See the illustration below.
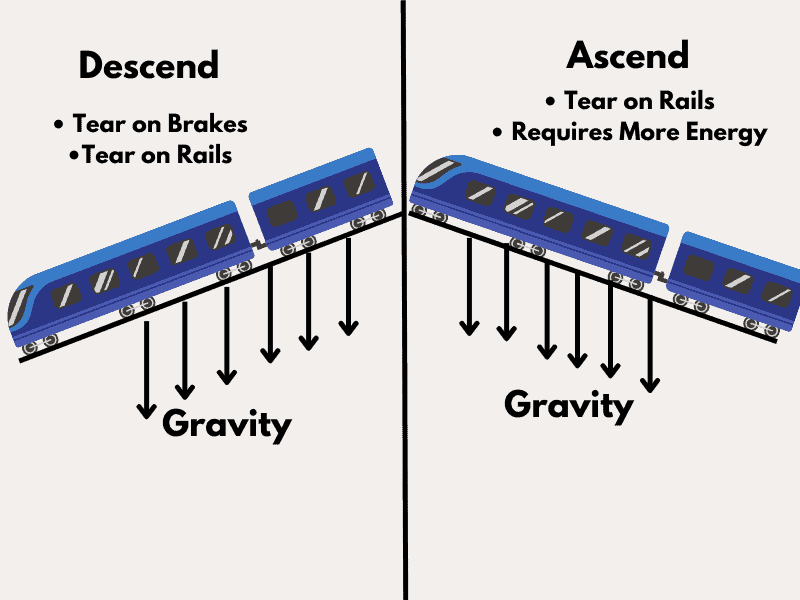
The stress on the engine, brakes, and rails is caused by gravity. The steeper the slope is, the more effect gravity has on the train.
For example, the train needs to apply some brakes while going downhill since gravity can accelerate the train speed to have the same speed.
This causes some strain on both the rail and the brakes.
On uphills, gravity will pull the train downwards. Thus, the engine needs to work more than usual. Unfortunately, this also causes wear and tear.
Furthermore, the gravity causes strain on the rails since it needs to hold down the train.
Generally speaking, the heavier the train, the harder it is to go on inclined rails.
But why am I explaining these concepts? Well, that is because while a 2.2% grade is rare in actual trains, model trains can usually go for more.
That’s why some modelers call two or more percent grades model grades.
But how do they measure grades in model trains, and why are grades also important? Well, let’s talk about that in the next section.
What is a % grade on Model Trains?
A % grade on model trains is the amount of change in rail height per 100 inches. For example, a 1% grade means that the track’s height changed by 1 inch on a 100-inch track. This rule applies to all scales, such as the HO, N, and OO scales.
However, some modelers, particularly those who live in the UK, have different naming for these grades.
For example, they call the 1% grade “1 in 100,” which stands for 1 inch for every 100 inches. They call the 2.5% “1 in 40,” which means 1 inch for every 40 inches.
Model train grades are different from actual train grades. In fact, while real trains don’t go higher than 2.2%, it is common for model trains to go as high as 6%.
The only difference here is the unit of measurement for the rail grade. Actual trains use feet, and model trains use inches.
That’s why a 4% grade on trains means that there is a 4 feet change in height per 100 feet.
When we say 4% grade in model trains, it means a 4-inch difference in height per 100-inch track.
But why do we use grades on model trains? Well, it boils down to simulation.
| Scale | 1% | 2% | 3% | 4% | 5% | 6% |
| HO | 1 inch per 100 inches | 2 inches per 100 inches | 3 inches per 100 inches | 4 inches per 100 inches | 5 inches per 100 inches | 6 inches per 100 inches |
| N | 1 inch per 100 inches | 2 inches per 100 inches | 3 inches per 100 inches | 4 inches per 100 inches | 5 inches per 100 inches | 6 inches per 100 inches |
| OO | 1 inch per 100 inches | 2 inches per 100 inches | 3 inches per 100 inches | 4 inches per 100 inches | 5 inches per 100 inches | 6 inches per 100 inches |
| O | 1 inch per 100 inches | 2 inches per 100 inches | 3 inches per 100 inches | 4 inches per 100 inches | 5 inches per 100 inches | 6 inches per 100 inches |
Why do we use % Grade on Model Trains?
We use % grade on model trains to make our layouts realistic. Having a pure flat track layout can be boring and unrealistic since the real world has slopes. Adding some inclines and declines makes the layout more realistic.
If you’re building your layout, you might also include some scenery, including mountains, rivers, and slopes.
That’s when you will notice that having a straight track is close to impossible.
While a circle or oval track doesn’t require any change in rail height, most complex layouts will require them to make it realistic.
That’s when we use grades on model trains.
The difference here is that you can make the height as high as you want as long as the model train motor can handle the incline. However, most wouldn’t go higher than 6%.
Also, to prevent some problems, in the long run, make sure that your train cars are within the NMRA weight recommendation. This will prevent any slip-ups when going uphills.
Furthermore, the train will have better control when it goes downhill.
These are the things you need to know about train grades. It isn’t as complicated as some people think it is. I hope it helped you in building your layout.
Just remember this simple rule: Don’t go higher than 6%.
What’s next? Is it true that you can make your model train track as long as you want? But wouldn’t that cause some issues such as voltage drops and short circuits? Well, yes, and I discussed how we could prevent problems when building a large layout which you can find here: How long can model train tracks be?